Concrete Contractors

How to Get Started in Brick Laying

As a bricklayer, you use clay bricks and concrete blocks in mortar to construct and repair walls and other structures. To be a bricklayer, you can take a pre-apprenticeship course at a technical college or university.

Understanding the difference between a brick’s specified size and actual dimensions is essential to precise planning in construction projects. Understanding the role of header and stretcher bricks is also vital. Visit https://www.bricklayerperthwa.com.au/ to learn more.

Brick Laying

Before you begin bricklaying, it is important to prepare the work area. Make sure that the area is clean, level, and free of debris. You will also need to purchase the necessary materials and tools. A trowel, a hammer, and a mason’s line are essential tools for bricklaying. A bolster, which has a chisel-like end for splitting bricks and a blunt end for tapping them into place, can also be useful.

Before laying your first course of bricks, you should create a straight line where you want to build the wall. This can be done with a string and a mason’s line, or you can use a plumb bob. It is important to check the level of your wall with a spirit level as you go. This will help ensure that the wall is square and straight.

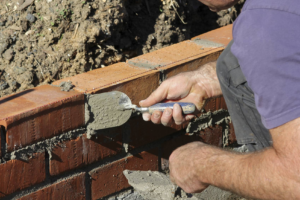
Once you have prepared the work area, apply a thin layer of mortar to the surface. This will serve as a foundation for your brick wall. It is important to follow the manufacturer’s instructions when mixing the mortar. If you add too much water or not enough sand, the strength of the mortar may be compromised.

Some bricklayers advise dampening the bricks before laying them. This is to ensure that the bricks have a consistent moisture content. However, this practice is not always recommended. Pressed and extruded bricks have a low water uptake, and dampening them would cause them to float on the bedding mortar. This could lead to the bricks sliding out of face line and sinking out of level.

As you start laying the bricks, keep in mind that you should stagger each course by half a brick. This will ensure that the wall is evenly spaced and provides a solid structure. It is also a good idea to use a spirit level and a plumb bob to check the level of each row as you go.

When the bricks have been laid, you can finish off the joints by using a tool called a jointer. This is a piece of tubing with a rounded edge that can be used to smooth out the mortar joints. This will help to create a clean, professional-looking brick wall.

It’s important to start with a concrete foundation for your brick wall or other structure. This will help with your leveling and making sure it’s straight. Once you’ve got your foundation, set up a line with string across the ground to mark where you want to start laying bricks. Aim for the top of the first brick in a row (also known as a course) to touch the line. This will ensure that the rest of your bricks in that row are perfectly aligned and make the whole wall as strong as possible.

The next step is to prepare your mortar, which will be a mix of three parts masonry sand and one part masonry cement. You can either use a wheelbarrow or a mortar box to mix your mortar. Using a spatula or trowel, add small amounts of each ingredient and mix well. It needs to be thick enough to hold the bricks but not so watery that it will smear the bricks or fall off. If your mortar is too dry, it will be difficult to place the bricks and if it’s too wet the bricks may sag.

Once your mortar is ready, you’re ready to begin laying bricks. Begin by placing the first brick down, with the long side facing down, on your mortar line and buttering it with some of the mortar. Then, put the next brick in, with the short end facing down and buttering it too. When the third brick is in, you’re ready to move on to the next row.

After you’ve finished your first row, you should check that everything is lined up and status by running a spirit level over the entire length of the bricks in that course. You should also lightly tap the bricks with your trowel handle to settle them in.

If the bricks are not level, you’ll need to repeat this process of laying bricks on a course until they’re all lined up and even. This will take a while, but it’s worth it in the long run because it will make your brickwork much stronger and more attractive.

Mortar is the thick paste that joins brick, block, stone and other masonry units. It is made of sand, a binder, and water. The most common binder is Portland cement, but lime mortar was also used in ancient masonry construction.

The strength of a mortar mix depends on the amount of cement, sand, and water that is added to the ingredients. It should be mixed until it is plastic enough to be worked easily with the mason’s trowel but not so much that it will collapse under the weight of a masonry unit. In addition, the sand and cement should be of a size to produce a strong bond between the masonry units.

Different types of mortar are used for different applications. Masonry experts must consider the perspective of each building project when choosing which type of mortar to use. For example, a homeowner may focus on budget and timelines while an architect will consider aesthetics. A mason contractor will also look at how the mortar will affect the structure’s integrity.

Most masons will make their own mortar from dry pre-mixed bags that can be combined with water. However, it is also possible to purchase ready-mixed mortar from a home improvement store or brickyard. Regardless of which type of mortar is purchased, it must be carefully mixed to ensure that the water-to-cement ratio is correct. If a mason mixes the mortar incorrectly, it can weaken the walls and cause the masonry to crack.

A bricklayer’s job duties can include laying and grouting brickwork, building retaining walls and foundations, and constructing concrete structures. In some states, a bricklayer can even be licensed to perform plumbing and electrical work on construction projects. Some colleges offer part-time courses in masonry that can help prepare an individual for the career. An apprenticeship with a bricklaying firm can be another way to gain entry into the field. An apprenticeship lasts about three to four years and splits time between on-the-job training and classroom learning. In many cases, the apprenticeship can lead to a full-time position as a bricklayer.

If you’re building a brick wall, it’s important that the first row, also known as a course, is perfectly straight. This will give the wall a strong foundation from which to develop into an impressive structure.

Before starting, dig a trench as deep as the bricks you will be using and fill this with mortar. This will provide a good base and help to prevent the bricks sinking after they have been laid.

When the mortar is ready to use, place a strip of hessian on a bench or another work surface and lay out your first course of bricks. Make sure the bricks are aligned with each other, and then check them with a spirit level. If necessary, add more mortar to the bed of the bricks to bring them up to level with each other.

The first brick should be butter (or spread) on both ends and then placed onto the mortar bed, ensuring it is level with the rest of the course. When the first course is complete, use a string line to mark where the next course should start.

While you’re working, it is important to clean off excess mortar and splashes from the face of the bricks as it sets. This helps to avoid smearing the brickwork and will keep it looking neat and tidy.

Once you’re ready to begin the next course, butter up a new brick and put it into place on the line you have marked. After a few more bricks have been laid, move the string line up to the 1/2 mortar marker and begin work on the second course.

To ensure that the bricks remain level and that all the mortar joints are even, it is a good idea to use a jointer before the mortar starts to set. A jointer is a piece of tubing, usually the same size or slightly bigger than the mortar joint, that has been bent into an “S” shape. This is rubbed along the mortar joints, causing them to be smoothed and filled.

The end of the brick is rounded off by striking it with a bolster chisel and lump hammer. This is done to create a neat finish to the brickwork and to strengthen the joint. After this, the bricks should be brushed with a foxtail brush to remove any stray bits of mortar that aren’t fully set.

Cleaning Services

5 Natural Ways to Clean Your Carpets

Carpets warm and add comfort to a home but also collect dirt, dust, pet hair, and bacteria. Regular cleaning helps prevent dirt and grit from damaging carpet fibers.

While professional hot water extraction cleaning is the best method for removing deep-seated dirt, you can do some basic steps at home to keep your carpets clean. Visit https://www.joondalupcarpetcleaners.com.au/ to learn more.

Joondalup Carpet Cleaners

Vacuuming carpets 1-2 times a week removes top surface dirt, which reduces matting, wear and tear, and keeps the color fresh. It also helps maintain healthy air quality by sucking up dust, allergens and other microscopic particles. Vacuuming can also be used to remove stains.

Before vacuuming, move objects like toys or chairs out of the way. This allows the vacuum to reach all corners and crevices without damaging the carpeting. It is important to use the right setting for your specific carpeting. Carpets with a textured appearance are better cleaned with a brush or agitating head, while cut pile carpets can be cleaned using a vacuum with suction only or a hose/wand.

When vacuuming, move slowly, allowing the vacuum to suck up the debris hanging between the carpet fibers. Moving too quickly prevents the device from being able to collect the full amount of debris and could even cause the fibers to be crushed. Make sure to empty the vacuum bag or replace it regularly and clean or change filters and brushes as needed.

Dirt, dust and other materials build up in rugs and carpets, leading to matting, abrasion, odor and even deterioration of the underlying material. Frequent vacuuming helps maintain your investment in carpets and rugs by extending their lifespan. It also improves your indoor environment by reducing airborne allergens such as dust mites, pollen, and pet dander, which can be particularly irritating for people with allergies or asthma. It also reduces odors caused by mold, mildew, tobacco smoke and cigarette residues. It is also important to vacuum carpets regularly in areas where people are most active, such as hallways, foyers and mudrooms.

Baking soda is an inexpensive natural product that can be used to clean and deodorize carpet. It’s safe for kids and pets, and will not discolor carpet fibers. You can use baking soda alone or in conjunction with vinegar, another natural cleaning hero, to help remove many types of stains and smells from your carpets.

Grease-based stains, such as those from pizza, mayonnaise and oily food spills, are often stubborn and can require more than one treatment. To tackle them, liberally sprinkle the affected area with dry baking soda. Next, blot up any solids with a paper towel, being careful not to rub, as this pushes the grease deeper into the fibers. Allow the baking soda to sit for a few hours or overnight for more stubborn stains. Finally, vacuum the area to remove the remaining baking soda and the stain.

Non-greasy stains, such as those from coffee, tea, wine and ink are usually easier to get up than grease stains. First, blot the affected area with a paper towel to lift away any solids and prevent further staining. Liberally sprinkle the spot with baking soda and then spritz it with a water-vinegar solution, following the directions on the bottle. Allow to sit for about three hours and then vacuum the area to remove the baking soda and the underlying stain.

Baking soda is an excellent deodorizer for carpets and can be used on a regular basis to keep your whole house smelling fresh. It absorbs odors rather than masking them, and is much safer than some of the commercial deodorizers that can contain harsh chemicals. It’s also a great choice for pet odors, as it won’t irritate your dogs or cats.

For the more stubborn carpet stains, you can use household ammonia to get rid of them. Before using it, however, you must make sure that your carpet is safe for such a high-alkaline solution. To do this, test it on an inconspicuous area of the carpet and let it dry completely. This will help you avoid any unwanted results. You should also avoid scrubbing the stain since doing so can cause it to spread and penetrate deeper into the fibers.

It is important to vacuum the carpet first to remove any big debris and dirt particles. Once this is done, you can start to apply the solution. You can use a sponge mop or an old rag to do this, but you should be careful to avoid getting too much of the solution on the carpet. A little goes a long way, so it is best to apply the solution in small circles over the stain.

Ammonia is a highly effective cleaning agent that can remove a wide range of stains, including blood, vomit, and food. However, it is important to remember that this substance can produce toxic fumes when applied to the carpet. Therefore, it is important to open windows and doors while applying this cleaner to allow fresh air to circulate.

In addition to removing stains, ammonia can also be used to deodorize your carpet. It works by releasing an odor that mimics the odor of urine. This can make pets think that the carpet is a suitable place for them to do their business. For this reason, you should not use ammonia on pet-friendly carpets. Instead, try an enzyme-based cleaner or hydrogen peroxide.

Vinegar is an inexpensive, natural cleaner that can be used to remove stains and bad smells from your carpet. Its acetic acid can dissolve many types of substances, including organic and inorganic materials such as urea, salt, protein, dyes, and fatty acids. It also acts as a disinfectant and can kill bacteria, including salmonella, E Coli, and some flu germs. It is safe for use on most carpets and rugs, although it can discolor certain types of wool or natural fiber carpets.

Before using vinegar, move any furniture away from the affected area and vacuum the carpet thoroughly. This will remove any loose dirt or other debris that may make the stain worse once it comes into contact with water.

Next, mix equal parts of water and vinegar in a spray bottle and apply to the stained area. Allow the solution to soak into the stain, then blot with a clean white cloth. Repeat as needed until the stain is removed. Be sure to use the cloth to blot, not rub, as this could spread or transfer the stain. Then, blot the carpet dry with a clean towel.

If you have a particularly stubborn greasy stain on your carpet, try combining baking soda with vinegar to create a paste. The acetic acid in the vinegar will break down greasy substances, and the baking soda will absorb the grease and other toxins. This mixture should be left on the stain overnight or for a few days to let it completely work its magic. After the paste is removed, the carpet should be cleaned with a water-vinegar solution as described above. This will help remove any residue and leave the carpet looking as good as new.

Aside from being a great at-home grooming product, shaving cream can also serve as a convenient and effective carpet cleaning hack. It isn’t as messy as a lot of commercial products or professional services and doesn’t introduce harsh chemicals into your home. The ingredients found in traditional shaving cream, like surfactants, can actually be beneficial for the soaking and removal of water-soluble stains from your carpets.

Using this cleaning method is fairly simple; first, use napkins or paper towels to blot up as much of the stain as possible. Then, apply shaving cream to the stain and let it sit for around 30 minutes. This allows the foam to penetrate deep into the carpet fibers, where it can break down and remove the stain. After the waiting period, simply blot the shaving cream (and the stain) away with a clean white cloth. Be sure to use only white shaving cream, as menthol or colored varieties may cause discoloration of the carpet (Lifehacker).

While this method won’t work for all types of stains and doesn’t address various smells like pet pee, it is still a useful strategy to have in your back pocket if you’re stuck with a stubborn stain. Plus, the process is simple and inexpensive, so it’s a great way to save some money while keeping your carpet looking fresh.

Junk Removal

What Can Junk Transport Do For You?

Junk removal services work to clean up our communities and recycle or donate as much of the unwanted items as possible. Junk Day Louisville KY also adheres to safe waste disposal guidelines.

Truck hauling involves junk removal professionals arriving at a customer’s home or business with a large truck and dumpster. They’ll load the dumpster with junk and haul it away as soon as they’re done.

junk removal

Furniture is one of the most common items transported by junk transport. It is important to know how to pack and load the furniture properly in order to avoid damage during transit. This is especially true for large pieces of furniture, which can be difficult to maneuver in and out of the truck. The best way to ensure that your furniture is protected during transportation is to have it crated or wrapped. This will protect it from moisture and other environmental factors that can cause damage to the furniture.

One of the most frequently transported items by junk transport is furniture. Proper packing and loading techniques are crucial to prevent furniture damage during transportation. This is particularly valid for bulky furniture, which can be challenging to load and unload from the truck. Having your furniture wrapped or crated is the best way to guarantee that it will be safe for transit. This will shield it from elements such as moisture and other outside influences that might harm the furniture.

Before shipping any furniture, it is important to measure its dimensions. This will help you determine the weight and class of your shipment, which will impact the cost of shipping. Use a tape measure to measure the height, width, and length of each piece of furniture, including any protruding areas. Record these measurements in inches and make sure to include the width of any drawers or shelves. Also, be sure to weigh your furniture on a scale after packing it, so you have accurate shipping information.

Measure the furniture’s dimensions before shipping any of it. This will assist you in figuring out the shipment’s weight and class, which will affect the shipping price. Measure the length, width, and height of each piece of furniture, as well as any areas that protrude, using a tape measure. Make sure to include the width of any drawers or shelves when you record these measurements in inches. To ensure precise shipping information, weigh your furniture on a scale after packing it.

Once you have the dimensions and weight of your furniture, you can calculate its density. This will help you determine which carrier to select and will save you money on shipping costs. Most carriers use the dimensions of a pallet, box, or crate to calculate the density, so be sure to measure the height, width, and length to get accurate measurements. It is also helpful to label your furniture items with markers or masking tape. This will prevent confusion during reassembly, and it can help you identify any parts that may require special handling.

You can determine the density of your furniture once you know its measurements and weight. This will save you money on shipping expenses and assist you in choosing the best carrier. To obtain precise measurements, measure the height, width, and length of the object. Most carriers use the dimensions of a pallet, box, or crate to determine the density. Labeling your furniture with markers or masking tape is also a good idea. This can help you identify any parts that might need special handling during reassembly and prevent confusion.

Polish manufacturers of furniture are among the leaders in the European Union in terms of exports. It is no wonder that logistics operators are focusing on this area of the industry. They provide services for the entire cycle of furniture logistics, from calculating transport prices to the final delivery of goods at the client’s premises. Moreover, they offer additional services, such as arranging and securing cargo on vehicles. They are also able to choose the right means of transport for specific orders and monitor the progress of transport at all stages, using GPS positioners and maintaining direct communication with drivers.

Appliances are bulky and heavy, and require unique electrical and water connections. Moving them from one home to another can be difficult and expensive, especially if they are not functioning at the new location. The best way to get rid of old appliances is to hire a junk transport service. Junk removal services can handle the heavy lifting and hauling of these bulky items. They can also dispose of them in a responsible and eco-friendly manner. Most appliances are made from metals, which can be recycled. A reliable junk removal company will always recycle as much as possible, including non-working appliances.

You can also donate working appliances to charity if you are not using them anymore. Most second-hand stores and non-profit groups are willing to accept these donations. In addition, you can get a tax deduction for these donations. Be sure to hire a junk removal service that is committed to environmentally sustainable practices and certifies their workers as e-waste specialists. You should also make sure that they have the proper equipment for handling hazardous waste.

E-waste, which includes everything from discarded laptops and desktop computers to cell phones and televisions, contains many heavy metals and chemicals, including mercury, cadmium and lead. These can be harmful to the environment and human health if not properly recycled or disposed of. Junk transport services often work with certified e-waste recycling centers, so their customers can be sure that their unused electronics are being used in an environmentally responsible way.

Many of the electronics that people send to these recycling centers are not even re-used or refurbished. Instead, they are shipped to developing countries that have few or no environmental regulations in place. Critics of this practice argue that it is easy for brokers who call themselves recyclers to ship this e-waste to these countries without bothering to screen for items like cathode ray tubes, which require special processing.

When these e-waste items reach these processing centers, they are dismantled and separated for different uses. Metals, such as steel and aluminum, are reused, while plastics are turned into new electronic devices or made into molded products. Paper and cardboard are pulped and repurposed into new products as well. Some of these items may contain toxic components that can leach into the soil or water and poison the surrounding environment, but junk removal companies work to ensure that they are not sending this hazardous waste to landfills.

Whether it’s a computer or cell phone that you no longer use, junk transport can haul these items to the proper destination for disposal. Often, electronic devices contain components that are toxic to the environment and must be disposed of properly in accordance with local guidelines. A full-service junk removal company will take these items and either recycle them or donate them to charity thrift shops.

Junk transport can also take unwanted trash to a landfill or waste-to-energy plant. However, most companies that provide this service are socially and environmentally conscious and will make an effort to separate reusable items from those that must go to the garbage dump. Depending on the company, this may include taking used furniture to a charity thrift store or donating working appliances and electronics to vocational schools and job training programs.

The word “junk” is a euphemism for something that is useless or superfluous, and it has been around for as long as humans have been producing waste. Historically, trash has been thrown out on the street or burned in large pits, but health concerns led to the development of garbage removal and recycling.

Modern junk transportation involves collecting trash from dumpsters and neighborhood trash cans and hauling it to waste transfer stations. These stations are the key to efficient and cost-effective solid waste management for cities and towns, and they allow garbage collectors to load up their trucks with more trash before it’s transported to a landfill or waste-to-energy facility. These sites are often built on former railroad sites that were once used to trans-load cargo and have the capacity to handle bulk trash collections.